
 owned by

Peter Reinhart's Artisan Breads Every Day
Sample Recipes
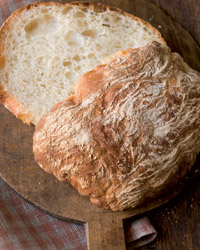
Pain a l'Ancienne Rustic Bread
Makes 2 large ciabatta loaves, 3 small ciabatta loaves, or 6 to 8 mini baguettes
4 1/2 cups (20 oz / 567 g) unbleached bread flour
1 3/4 teaspoons (0.4 oz / 11 g) salt, or 21/2 teaspoons coarse kosher salt
1 1/4 teaspoons (0.14 oz / 4 g) instant yeast
2 cups (16 oz / 454 g) chilled water (about 55°F or 13°C)
1 tablespoon (0.5 oz / 14 g) olive oil (for ciabatta only)
Do Ahead
Combine the flour, salt, yeast, and water in a mixing bowl. If using a mixer, use the paddle attachment and mix on the lowest speed for 1 minute. If mixing by hand, use a large spoon and stir for about 1 minute, until well blended. The dough should be coarse and sticky. Let the dough rest for 5 minutes to fully hydrate the flour.
If making ciabatta, drizzle the olive oil over the dough; if making mini baguettes, omit the oil. Then mix on medium-low speed using the paddle attachment, or by hand using a large, wet spoon or wet hands, for 1 minute. The dough should become smoother but will still be very soft, sticky, and wet. Use a wet bowl scraper or spatula to transfer the dough to a clean, lightly oiled bowl. Cover the bowl with plastic wrap and let the dough rest at room temperature for 10 minutes.
Transfer the dough to a lightly oiled work surface. With wet or oiled hands, reach under the front end of the dough, stretch it out, then fold it back onto the top of the dough. Do this from the back end and then from each side, then flip the dough over and tuck it into a ball. The dough should be significantly firmer, though still very soft and fragile. Place the dough back in the bowl, cover, and let sit at room temperature for 10 minutes. Repeat this process three more times, completing all repetitions within 40 minutes. (You can also perform the stretch and folds in the bowl, as shown on page 17.)
After the final stretch and fold, immediately cover the bowl tightly and refrigerate overnight or for up to 4 days. The dough will rise, possibly to double its original size, in the refrigerator. (If you plan to bake the dough in batches over different days, you can portion the dough and place it into two or more oiled bowls at this stage.)
On Baking Day
Remove the dough from the refrigerator about 1 hour before baking for mini baguettes, and 3 hours in advance for ciabatta (or an hour earlier if the dough hasn't increased to 11/2 times its original size in the refrigerator overnight).
To make ciabatta, about 1 hour after taking the dough out of the refrigerator, line the back of a sheet pan with parchment paper and generously dust the entire surface with flour. Use a wet or oiled bowl scraper to transfer the dough to the work surface, taking care to handle the dough as little as possible to avoid degassing it.
Dust the top surface of the dough with flour and also flour your hands. Using your hands or a metal pastry scraper, gently coax and pat the dough into a rough square measuring about 9 inches on each side, still taking care to degas it as little as possible.
For small ciabatta, cut the dough into 3 even strips about 3 inches wide and 9 inches long (the pieces will each weigh about 12 ounces or 340 grams). For larger ciabatta, cut the dough in half. With floured hands, gently fold the dough in thirds, like folding a letter but without applying any pressure. Gently roll the folded dough in the dusting flour to coat it, then lift the dough and place it on the parchment paper, again rolling it in the dusting flour on the parchment. Rest the dough seam side down on the parchment and repeat with the other pieces of dough.
Mist the tops of the dough pieces with spray oil and loosely cover the pan with plastic wrap or a clean, lint-free towel. After 1 hour, gently roll the pieces over so the seam side is up, lift and cradle each piece with floured hands, and, working from the underside, gently coax it to a length of 5 inches (for small ciabatta) to 7 inches (for large ciabatta). Lay the pieces back on the parchment seam side up. Straighten the sides of each piece with your hands or a pastry scraper so that they are more rectangular than oblong, mist with spray oil again, then cover loosely and proof for 1 hour more.
About 45 minutes before baking, preheat the oven to 550°F (288°C) or as high as it will go, and prepare the oven for hearth baking (see page 30).
Slide the dough, parchment and all, onto the stone; if you aren't using a baking stone, simply put the whole pan into the oven. Pour 1 cup of hot water into the steam pan, then lower the oven temperature to 450°F (232°C).
Bake for 12 minutes, then rotate the pan and bake for 15 to 20 minutes more, until the crust is a rich brown (streaked with the dusting flour). The bread should puff a little, and the crust should be hard when tapped (it'll soften as it cools). Cool on a wire rack for 45 minutes before slicing.
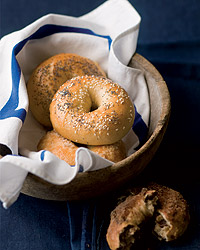
Bagels
Makes 6 to 8 bagels
Let’s clear something up right away: New York City isn’t the only place in the world to get decent, authentic bagels. The truth is, you can make bagels that are just as good at home, no matter where you live. They’re one of the simplest breads to make, requiring only flour, water, salt, yeast, and malt—and one secret ingredient: time (in the form of long, slow, cold fermentation). Any decent bagel shop knows this and uses an overnight method to stretch out the fermentation process, releasing all sorts of subtle flavors trapped in the flour. While bagel shops often use a type of high-protein flour not available to home cooks to achieve that distinctively chewy texture, regular, unbleached bread flour can also do the trick. The real key is to use a much lower percentage of water than is used for baguettes and other European hearth breads, producing a stiff dough that can stand up to a dunking in boiling water before going into the oven. More than any ingredient or other aspect of the method, this boiling step is what defines the uniqueness of the bagel.
That said, bagels do usually feature one other distinctive ingredient: barley malt. While this may seem like an exotic, hard-to-find product, it’s actually commonly available at most supermarkets, usually labeled “barley malt syrup.” If you can’t find it, simply substitute an equal amount of honey. Your bagels might not have that malty flavor, but they’ll still be better than almost any bagel you can buy.
One final note: If you like bagels but don’t want to set up the boiling operation for just six of them, feel free to double the size of the batch and bake enough to freeze for future use.
Dough
1 tablespoon (0.75 oz / 21 g) barley malt syrup, honey, or rice syrup, or 1 teaspoon (0.25 oz / 7 g) diastatic malt powder
1 teaspoon (0.11 oz / 3 g) instant yeast
11/2 teaspoons (0.37 oz / 10.5 g) salt, or 21/2 teaspoons coarse kosher salt
1 cup plus 2 tablespoons (9 oz / 255 g) lukewarm water (about 95°F or 35°C)
31/2 cups (16 oz / 454 g) unbleached bread flour
Poaching Liquid
2 to 3 quarts (64 to 96 oz / 181 to 272 g) water
11/2 tablespoons (1 oz / 28.5 g) barley malt syrup or honey (optional)
1 tablespoon (0.5 oz / 14 g) baking soda
1 teaspoon (0.25 oz / 7 g) salt, or 11/2 teaspoons coarse kosher salt
Do Ahead
To make the dough, stir the malt syrup, yeast, and salt into the lukewarm water. Place the flour into a mixing bowl and pour in the malt syrup mixture. If using a mixer, use the dough hook and mix on the lowest speed for 3 minutes. If mixing by hand, use a large, sturdy spoon and stir for about 3 minutes, until well blended. The dough should form a stiff, coarse ball, and the flour should be fully hydrated; if it isn’t, stir in a little more water. Let the dough rest for 5 minutes.
Resume mixing with the dough hook on the lowest speed for another 3 minutes or transfer to a very lightly floured work surface and knead by hand for about 3 minutes to smooth out the dough and develop the gluten. The dough should be stiff yet supple, with a satiny, barely tacky feel. If the dough seems too soft or overly tacky, mix or knead in a little more flour.
Place the dough in a clean, lightly oiled bowl, cover the bowl tightly with plastic wrap, and let the dough rise at room temperature for 1 hour.
When you’re ready to shape the bagels, prepare a sheet pan by lining it with parchment paper or a silicone mat, then misting it with spray oil or lightly coating it with oil. Divide the dough into 6 to 8 equal pieces. (A typical bagel is about 4 ounces or 113 grams before baking, but you can make them smaller. If you make more than 6 bagels, you may need to prepare 2 sheet pans.) Form each piece into a loose ball by rolling it on a clean, dry work surface with a cupped hand. (Don’t use any flour on the work surface. If the dough slides around and won’t ball up, wipe the surface with a damp paper towel and try again; the slight bit of moisture will provide enough traction for the dough to form into a ball.) There are two methods to shape the balls into bagels.
The first method is to poke a hole through the center of the ball to create a donut shape. Holding the dough with both thumbs in the hole, rotate the dough with your hands, gradually stretching it to create a hole about 2 inches in diameter.
The second method, preferred by professional bagel makers, is to use both hands (and a fair amount of pressure) to roll the ball into a rope about 8 inches long on a clean, dry work surface. (Again, wipe the surface with a damp towel, if necessary, to create sufficient friction on the work surface.) Taper the rope slightly at each end and moisten the last inch or so of the ends. Place one end of the dough in the palm of your hand and wrap the rope around your hand to complete the circle, going between your thumb and forefinger and then all the way around. The ends should overlap by about 2 inches. Squeeze the overlapping ends together by closing your hand, then press the seam into the work surface, rolling it back and forth a few times to seal. Remove the dough from your hand, squeezing it to even out the thickness if need be and creating a hole of about 2 inches in diameter.
Place each shaped bagel on the prepared sheet pan, then mist with spray oil or brush with a light coating of oil. Cover the entire pan with plastic wrap and refrigerate overnight or for up to 2 days. (You can also proof the full piece of dough in the oiled bowl overnight and then shape the bagels on baking day, 60 to 90 minutes before boiling and baking them, or as soon as they pass the float test.)
On Baking Day
Remove the bagels from the refrigerator 60 to 90 minutes before you plan to bake them, and if you plan to top them with dried onion or garlic, rehydrate those ingredients (see the variations on page 78). Immediately check whether the bagels are ready for baking using the “float test”: Place one of the bagels in a small bowl of cold water. If it sinks and doesn’t float back to the surface, shake it off, return it to the pan, and wait for another 15 to 20 minutes, then test it again. When one bagel passes the float test, they’re all ready to be boiled. If they pass the float test before you are ready to boil and bake them, return them to the refrigerator so they don’t overproof. About 30 minutes before baking, preheat the oven to 500°F (260°C) and gather and prepare your garnishes (seeds, onions, garlic, and so on).
To make the poaching liquid, fill a pot with 2 to 3 quarts (64 to 96 oz / 181 to 272 g) of water, making sure the water is at least 4 inches deep. Cover, bring to a boil, then lower the heat to maintain at a simmer. Stir in the malt syrup, baking soda, and salt.
Gently lower each bagel into the simmering poaching liquid, adding as many as will comfortably fit in the pot. They should all float to the surface within 15 seconds. After 1 minute, use a slotted spoon to turn each bagel over. Poach for another 30 to 60 seconds, then use the slotted spoon to transfer it back to the pan, domed side up. (It’s important that the parchment paper be lightly oiled, or the paper will glue itself to the dough as the bagels bake.) Sprinkle on a generous amount of whatever toppings you like as soon as the bagels come out of the water (except cinnamon sugar; see the variation on page 78 for details).
Transfer the pan of bagels to the oven, then lower the oven heat to 450°F (232°C).
Bake for 8 minutes, then rotate the pan and check the underside of the bagels. If they’re getting too dark, place another pan under the baking sheet. (Doubling the pan will insulate the first baking sheet.) Bake for another 8 to 12 minutes, until the bagels are a golden brown.
Cool on a wire rack for at least 30 minutes before slicing or serving.
Variations
You can replace any amount of the bread flour with an equal amount of whole grain flour (by weight), such as wheat or rye. If you do so, increase the water in the dough by 1 tablespoon (0.5 oz / 14 g) for every 2 ounces (56.5 g) of whole grain flour you substitute.
Top your bagels with any combination of the following garnishes: poppy seeds, sesame seeds, coarse salt, or rehydrated dried onions or garlic. (Soak dried onions or garlic in water to cover for at least 1 hour before applying.) The toppings will stick even better if you first brush the top of each bagel with an egg white wash made by whisking 1 egg white with 1 tablespoon (0.5 oz / 14 g) of water. If using coarse salt as a garnish, remember that a little goes a long way.
For raisin bagels, mix in 11/3 cups (8 oz / 227 g) of raisins during the final 2 minutes of mixing and, if you like cinnamon, stir 1/2 teaspoon (0.14 oz / 4 g) of ground cinnamon into the flour before you start mixing. When the bagels come out of the oven, brush the tops with melted butter and dip the top into a bed of cinnamon sugar to give it a very tasty cinnamon crust. You can make cinnamon sugar by whisking 2 tablespoons (1.6 oz / 44 g) of ground cinnamon into 1/2 cup (4 oz / 113 g) of granulated sugar.
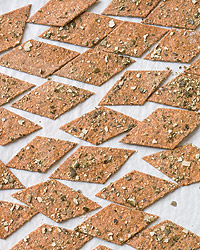
Crispy Rye and Seed Crackers
Makes 4 pans of crackers
Okay, I’ll admit it: Although I’m known primarily as a bread guy, I’ve been eating far more crackers than bread lately—probably always have, actually, and it’s a safe bet that I always will. Sure, artisan bread is the sexy sister, but a good cracker is the hardworking Cinderella of baked goods, and I think it’s time to bestow the glass slipper. In fact, I have a feeling that there are many other undeclared cracker freaks out there just waiting for crackers to be validated as a significant player in the exploding American culinary renaissance.
A quick look at supermarket shelves shows that the real growth for both crackers and bread is occurring in the whole grain category. Even iconic brands such as Ritz are coming forth with whole grain products. I’ve spent nearly twenty years trying to convince folks to bake bread at home, even tilting at windmills by trying to encourage them to make 100 percent whole grain breads at home, but I’ve encountered far less resistance in urging that same audience to try making their own whole grain crackers. Why the receptivity? It’s probably because crackers are far easier and faster to make than bread (and the dough doesn’t even need to be held overnight in the refrigerator).
But I also think there are deeper reasons. Crackers are so versatile, and so easily substituted for chips and other guilt-laden snacks. Whole grain crackers are the perfect, guilt-free snack. Not only do they have a satisfying, toasty flavor, they’re also loaded with dietary fiber, which helps lessen cravings for sweets and reduce mindless eating between meals. When properly made, crackers have a long finish. Eat some now and you’ll still be enjoying the lingering, earthy flavors in 30 minutes.
Crackers can be naturally leavened with yeast, like Armenian lavash; be chemically leavened with baking powder or baking soda, like many commercial crackers; or be completely unleavened, like matzo or Triscuits. They’re usually crisp and flaky but don’t have to be. They can be buttery (with real or fake butter), or lean and mean, like saltines and other variations of water crackers. Whole grain crackers, regardless of the leavening method, have one major factor going for them: fiber, lots and lots of fiber.
This cracker recipe is easy to make at home, even if you’ve never baked a loaf of bread in your life. It’s a variation of one of the most popular recipes from my previous book, Peter Reinhart’s Whole Grain Breads, and is especially fun to make with kids. I’ve adjusted the recipe so that these crackers, which are unlike any crackers you can buy, are even more crisp than the original. I’m ready to start a home-baked cracker revolution to match the bread revolution of the last fifteen years and hope I can enlist you in the cause.
1/4 cup (1.5 oz / 42.5 g) sunflower seeds
1/4 cup (1.5 oz / 42.5 g) pumpkin seeds
3 tablespoons (1 oz / 28.5 g) flaxseeds
6 tablespoons (2 oz / 56.5 g) sesame seeds
13/4 cups (8 oz / 227 g) rye flour
1/4 teaspoon salt, or 1/3 teaspoon coarse kosher salt
2 tablespoons (1 oz / 28.5 g) vegetable oil
1 tablespoon (0.75 oz / 21 g) honey or agave nectar
3/4 cup (6 oz / 170 g) water, at room temperature
Egg white wash or sweet wash (see sidebar, opposite)
Garnishes (see variations, opposite)
Do ahead
Grind the sunflower and pumpkin seeds into a fine powder or flour in a blender or spice grinder. Blend in pulses and be careful not to blend too long, or they’ll turn into seed butter. Separately, grind the flaxseeds into a fine powder.
Combine the seed powders and the whole sesame seeds, rye flour, salt, vegetable oil, honey, and water in a mixing bowl. If using a mixer, use the paddle attachment and mix on slow speed for 1 to 2 minutes. If mixing by hand, use a large, sturdy spoon and stir for 1 or 2 minutes. The dough should quickly form a firm ball and shouldn’t be sticky. Stir in flour or water as needed to adjust the texture.
Transfer the dough to a lightly floured work surface and knead for about 30 seconds to be sure all of the ingredients are evenly distributed and that the dough holds together. It should be slightly tacky but not sticky.
Preheat the oven to 300°F (149°C), or 275°F (135°C) for a convection oven, and prepare 1 baking sheet for each quarter of the dough that you plan to bake, lining them with parchment paper or a silicone mat. You don’t need to oil the paper or liner.
Divide the dough into four equal pieces. (For any that you won’t be baking right away, wrap them well, and refrigerate for up to 1 week or freeze for up to 3 months; the flavor actually improves after a day or two in the refrigerator.) Use a rolling pin to roll out one portion of the dough on a floured work surface, frequently lifting the dough with a metal pastry scraper or bowl scraper to be sure it isn’t sticking and dusting with more flour underneath if need be. You can also flip the dough over and continue rolling with the bottom side up. The goal is to roll it to about 1/16 inch in thickness. If the dough resists, gently set it aside and begin rolling out another piece, or let it rest for about 2 minutes. When you return to it, it will roll more easily.
Finishing the dough and baking
Brush the surface of the dough with an even coating of whichever wash you prefer, then sprinkle the surface with whatever garnishes you like (see the variations below).
Use a pizza cutter to cut the rolled dough into rectangles, diamonds, or other shapes. You can also use a small biscuit cutter dipped in flour to make round crackers, but this takes longer, and then you have leftover dough. The crackers need not all be the same size. Transfer the crackers to the prepared pan. They can be nearly touching, as they won’t spread or rise.
If making more than one pan of crackers, you can bake them all at once. Place the pans on different shelves and bake for 10 minutes, then rotate the pans and bake for another 10 minutes. Rotate the pans once more and continue baking until they’re done—typically 25 to 30 minutes altogether, but it depends on how thin you roll them and on your oven. The crackers are done when they have a rich golden brown color and are fairly dry and crisp. Leave them on the pans to cool so they’ll crisp up even more. To get a little more browning on the crackers, increase the heat to 325°F (163°C) after they’ve dried sufficiently to be crisp (20 to 25 minutes). If they don’t snap cleanly after they cool, return the pan to a hot oven for a few more minutes until they dry sufficiently to snap when broken.
Cool for at least 15 minutes before serving. Once thoroughly cooled, the crackers can be stored in an airtight container at room temperature for about 8 days, or in a ziplock bag in the freezer indefinitely.
Variations
Sesame seeds and poppy seeds are the best garnishing seeds because they’re light, and because their flavor isn’t so strong that they’ll overpower the taste of the cracker, as something like cumin or anise seeds would. Flaxseeds are a little too hard to chew, especially when baked on top of crackers, but some people do like them as a garnish. Other savory garnishes include garlic salt, lemon pepper, and other common spice blends and rubs. You can make wonderful toppings by combining herbs and oil, such as herbes de Provence covered with just enough oil to make a paste. In this case, don’t use a glaze; simply brush the oil on the cracker dough just prior to baking. Flavored herb and garlic oils can also be brushed onto the crackers as soon as they come out of the oven, to shine them up and add flavor. If you try this, return the crackers to the oven for 5 minutes more to set the glaze.
This recipe uses rye flour for a unique flavor, but you can substitute either regular whole wheat flour or the newly popular white whole wheat flour, which is a lighter color and has a slightly sweeter, less bitter flavor than traditional red wheat. You can also use all-purpose flour if you prefer a lighter cracker, and reduce the water by 1 tablespoon for every 2 ounces of white flour that you substitute.
Garnishing Washes
To make the garnishes stick to the dough, you need either an egg white wash for savory crackers or a sweet wash for seeds or a sweet garnish. To make the egg wash, whisk 1 egg white with 2 tablespoons of water. To make the sweet wash, whisk 1 tablespoon of honey or agave nectar with 3 tablespoons of water.
Reprinted with permission from Peter Reinhart's Artisan Breads Every Day: Fast and Easy Recipes for World-Class Breads by Peter Reinhart, copyright ©2009. Published by Ten Speed Press, a division of Random House, Inc.
Photo credit: Leo Gong ©2009
Login or register to add your own reviews from this cookbook.