

 owned by

Website: Smitten Kitchen
Orangette
Page: smittenkitchen.com/2006/11/candy-girl/
| Course Type: Other
 View photos (3)
Tags: orange gift orangette candied
Recipe Reviews
Queezle_Sister from Salt Lake City, UT
I have childhood memories of my older sister making candied citrus peel; to rekindle these memories I gave this recipe a go.
Two steps of boiling the peel had me really worried - I seemed to be pouring off so much wonderful aroma. But have no fear, the final product is awesome.
I let my candied peel sit for 2 days before applying chocolate. I liked the orange peel taste so much, I only wanted a kiss of chocolate. So instead of immersion, I applied the chocolate to only one side. Result: the perfect orange and chocolate stoichiometry.
My only regret was that I wasn't careful about which side of the peel to dip. It would have been prettier had I dipped the pith side of the peel (instead of random).
friederike from Berlin,
What a brilliant thing to make! I've always wanted to make something like this, but I always suspected that it would be complicated and tiresome. And actually, it isn't! If you work efficiently and use two pots instead of one, you can have most of your work done within twenty minutes!
Of course you shouldn't do what Deb tells you not to do, and that is not checking on them while they are simmering in syrup - of course that is precisely what I did. Looks pretty cool when it's burnt, but that's about it (luckily I had enough oranges around to give it another try).
I noticed that they take quite long to dry - at least 24 hours, with the fan in the oven turned on for several hours. Without fan they will still be pretty sticky long after that. Don't stir too much while they are simmering, or they will break into pieces too small to place on your rack. Expect one rack per two oranges - I actually blanched the peel of four oranges the second time I did this and froze half of it, we'll see how they are after thawing. And if you like you can also coat them with sugar while they are sticky - tastes good and looks great!
Edited 26 January 2014:
I made these again. I bought a fairly large navelina orange, and a few smaller moro blood oranges. This made me think that perhaps the last time the proportions were off as the size of the orange has a considerable influence on the amount of skin. The navelina orange weighed 335 g whole, it's skin weighed 78 g. The blood oranges weighed only about 130 g each, and the skin weighed 30 g. So it would have been quite a difference if I had used either four large oranges (skin weight 320 g) or four small ones (skin weight 120 g).
Also, the skin of the navelina orange was thick, meaning it would perhaps benefit from boiling a little longer (= more sugar syrup). The skins of the blood oranges were thin and very short (= small orange), which made it very fiddly, but they also dried a lot quicker.
I decided to make two batches of oranges, using 4 ounces (115 g) of sugar and water each for the navelina orange and the same amount of sugar syrup for two of the blood oranges. Both boiled about an hour and 15 minutes, though the navelina was already starting to get burnt while the blood oranges didn't. The blood oranges turned out beautifully but I think the oranges could have boiled a little longer.
Given that the sugar syrup for the blood oranges contained the double amount of sugar (115 g) compared to the orange skins (60 g), I would stick to this ratio the next time I make orangettes again, perhaps even adding a bit extra sugar syrup when the orange skin is very thick. Remember that ideally you'll be able to let them dry for 48 hours!
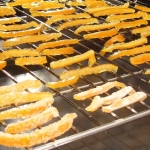
We served the orangettes as part of our Big Mac dessert: store-bought Lebkuchen (photo) as buns, Cinnamon Ice Cream patties, store-bought cranberry sauce as tomato ketchup, mint leaves as salad and the orangettes (sans chocolate) as french fries - it looked really good!
(edited 31st January 2014) (0) comment (3) useful
JustLaura from , CO
Tasted wonderful but looked bad. Chocolate got ugly overnight - I'm sure that was the cook and not the recipe but I'm not sure what to do to make sure that doesn't happen again.
Login or register to add your own review of this recipe.